Giới thiệu
Đối với một số hệ thống đòi hỏi việc bảo mật cao nhằm hạn chế tối đa khả năng bị thất thoát dữ liệu. Ngoài việc giới hạn truy cập SSH thông qua một số IP được phép, tắt xác thực thông qua password, sử dụng public key để xác thực. Ta có thể sử dụng thêm một hình thức nữa là cấu hình xác thực truy cập thông qua Google Authenticator. Sử dụng phương pháp này sẽ đảm bảo hệ thống của bạn sẽ chỉ có bạn mới có thể truy cập được. Do mã OTP chỉ được generator từ thiết bị mà bạn cài đặt.
Trong bài viết này, 123host sẽ hướng dẫn các bạn cấu hình xác thực thông qua Google Authenticator khi truy cập SSH trên CentOS 7
Lưu ý:
- Cần enable
Hướng dẫn
- Tiến hành cài đặt epel-release repo
yum install epel-release -y
- Cài đặt pack google-authenticator
yum install -y google-authenticator
- Chạy lệnh sau sau khi cài đặt hoàn tất để tạo ra secret key:
google-authenticator
- Hệ thống sẽ đưa cho bạn các lựa chọn như:
Do you want authentication tokens to be time-based (y/n) y
Do you want me to update your “/root/.google_authenticator” file? (y/n) y
Do you want to disallow multiple uses of the same authentication
token? This restricts you to one login about every 30s, but it increases
your chances to notice or even prevent man-in-the-middle attacks (y/n) yBy default, a new token is generated every 30 seconds by the mobile app.
In order to compensate for possible time-skew between the client and the server,
we allow an extra token before and after the current time. This allows for a
time skew of up to 30 seconds between authentication server and client. If you
experience problems with poor time synchronization, you can increase the window
from its default size of 3 permitted codes (one previous code, the current
code, the next code) to 17 permitted codes (the 8 previous codes, the current
code, and the 8 next codes). This will permit for a time skew of up to 4 minutes
between client and server.
Do you want to do so? (y/n) yIf the computer that you are logging into isn’t hardened against brute-force
login attempts, you can enable rate-limiting for the authentication module.
By default, this limits attackers to no more than 3 login attempts every 30s.
Do you want to enable rate-limiting? (y/n) y
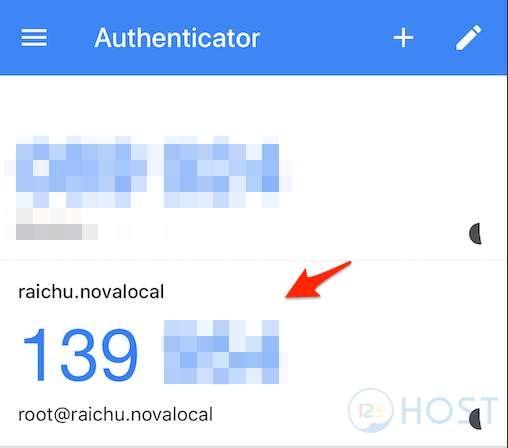
- Đồng thời hệ thống sẽ tạo ra 1 mã QR code, bạn có thể dùng app Google Authenticator trên điện thoại scan và sử dụng. Hệ thống cũng sẽ tạo emergency scratch codes dùng để truy cập SSH trong trường hợp bạn làm mất điện thoại, các code này chỉ sử dụng được 1 lần.

- Ta scan mã QR code trên bằng app Authenticator trên điện thoại.
- Tiến hành cấu hình để hệ thống sử dụng xác thực thông qua Google Authenticator khi login:
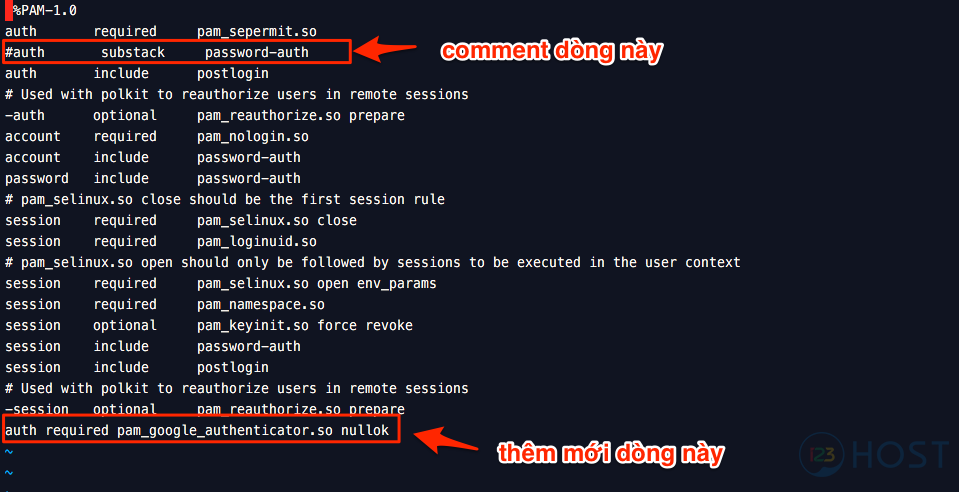
- Thêm dòng sau vào file /etc/pam.d/sshd:
auth required pam_google_authenticator.so nullok
- Đồng thời commend dòng auth substack password-auth.
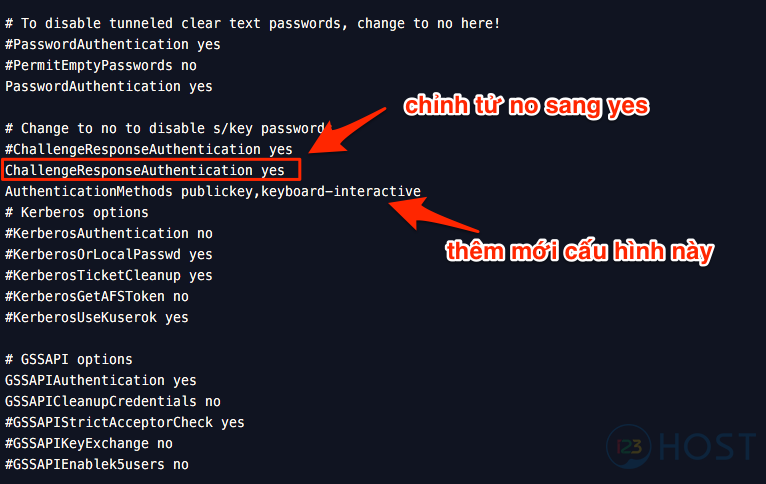
- Tiến hành chỉnh sửa file /etc/ssh/sshd_config:
- Tìm tới dòng ChallengeResponseAuthentication, chuyển setting từ no sang yes
- Thêm mới dòng AuthenticationMethods publickey,keyboard-interactive.
- Khởi động lại service sshd sau khi hoàn tất:
systemctl restart sshd
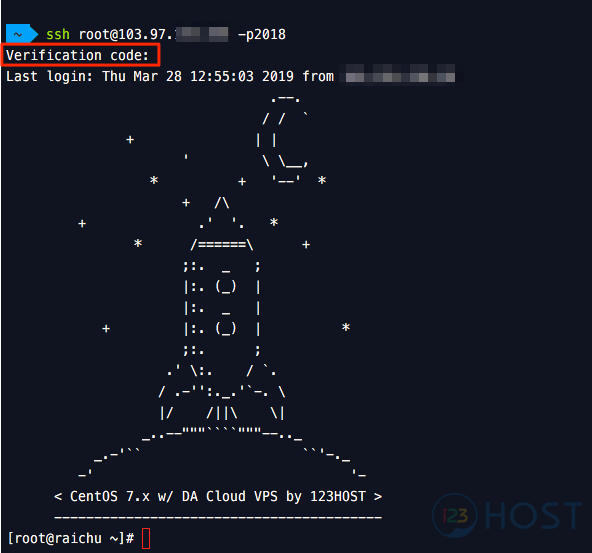
- Như vậy, mỗi lần user root đăng nhập hệ thống, cần phải nhập mã OTP được generator trên Google Authenticator App mới có thể đăng nhập hệ thống.

Leave A Comment?